Friday 28 February 2014

Black with Two February Challenge Entry

Hi Everyone,
Here is the mood board from Black with Two:


And here is my entry:


Here is a close up:  


I creates this page by firstly coating the black cardstock with black gesso. While this may sound a little over the top, I wanted the color to stay out of the cardstock where it loses it's vibrancy. Next I used moulding paste through a stencil. I then let that dry and while that was happening I chose my photos and the papers to match both the photos and the mood board. I very loosely followed the idea of the sketch and followed the idea of the picture with alternating colors. I then ripped the papers to the correct height and then cut them to the required length. I also distressed the photos and glued them onto the photo mat. When the background was dry I completed my page.  

See you all again soon.
Love
Michelle


Scrap Our Stash SWAK Challenge Entry

Hi Everyone,

the brief for the SWAK challenge was to:
S - sewing
W - washi tape
A - an arrow
K - kraft

And here is my entry:


Here is some close up:  


To create this page I started by applying glimmer mist to the background card stock. I then cut my papers and backed them all in black cardstock. I then cut my photo down slightly and matted it on a piece of black cardstock that was 5x7. I then punched a scrap with a boarder punch. I then laid everything where I it and glued them down. I then added my title,  and the washi tape. Finally I decided where I wanted my stitching, made the holes and completed the stitching.

Unfortunately I missed the deadline by six hours, helps if you get the day it's due right, lol.

See you all again soon.

Love
Michelle

Thursday 27 February 2014

Stuck February 15th Reveal Challenge Entry

Hi Everyone,

Here is the sketch from the February 15th Reveal:


This is the photo I took inspiration from for my colors and background design:


And here is my entry:


Here is a close up:


To create this page I gesso-ed the background by scraping the gesso on with an old iTunes card. Then I added moulding paste through a stencil and let it to dry. While that dried I chose papers to go with my photos, I used the Polly Scraps Passionfruit Souffle kit. I then used a wash of spray ink and water to paint the background and dried it with my heat gun. I then used a tiny paintbrush to paint the lime green spray on some of the dots to mimic my photo inspiration. Once again I dried it with my heat gun, to speed the process up. I then added the turquoise spray ink my splattering it and then using a dropper to create the larger spots. I let this dry naturally for a while and then soaked the rest up with paper towel.
While  the last little bit was drying off I cut the papers to size, matted my photos and decided what sticker I wanted to use. I then completed the page.

See you all again soon.

Love
Michelle

Tuesday 25 February 2014

Stuck! February 1st Reveal Challenge Entry

Hi Everyone,

Here is the February 1st Reveal sketch from Stuck:


And here is my entry:


Here are some close ups: 


I really twisted this sketch up, although I kept the general idea of it. To create this page I started with a gesso-ed background (I always have a few of these at hand. I tend to create a few when my mojo is at a low or late at night when I can't sleep), and then glued the die-cut book paper and die-cut shapes to the page with matte gel medium. While that was drying I chose the papers to go with my photo. These papers are the new Polly Scraps main kit: Passionfruit SoufflĂ©. I love this kit, the colors are great. I then cut what I needed to size. The vellum in the background is a left-over piece from my LSS Stamp Crafts Mount Bundy Retreat last year (I made little bags for each person attending). With the first layer dry I scrapped gesso over the entire page. When this was dry I added the initial color  by spraying onto the plastic sleeve my kit ce in and then flipped and spread over my page with my hands. When this was dry, I spritz spray at in rivals along the top and allowed it to run down the page. I let this bit dry naturally as it creates better light and shade in the runs. I then worked out where my cluster was going and then used my gelatos to color in feature pieces of my background. I then completed my page.

See you all again soon.

Love
Michelle

Sunday 23 February 2014

Inkido February Challenge Entry

Hi Everyone,

Here is the inspiration from Inkido:


And here is my entry:  


Here are some close-ups:


Firstly, I was inspired by just about all of the colors of the inspiration mood board by Inkido (somehow pink seems to have become my dominate color), but I was also inspired by a page I did ages ago and my LSS Stamp Craft wit Nicolee Cable. To create this page I started with the letter stenciling in the background in white, followed by the colored splatters. While this dried I painted the chipboard fence with gesso and then white paint, matted my photo, stamped and painted (with my trusty watercolors) my butterfly on kraft cardstock, cut out some shapes (I did not use them all) and edged them in white paint and painted the chipboard leaf with gesso and then copper paint. the orange under the photo was left over from my original page. I then put the page together, added my title and wrote my journalling.  

See you all again soon.

Love
Michelle

Creative Scrappers Sketch #262 Challenge Entry

Hi Everyone,

Here is sketch #262 from Creative Scrappers:


And here is my entry: 


To create this page I first gesso-ed the base cardstock, and then I stuck left-over edges of book pages from another project and masking tape and then covered it all with a layer of gel medium. While that was drying naturally, so I didn't get any bubbles from using the heat gun, I chose my papers based on my photos. I cut out all the 'arrow' shapes by creating a template and then roughly cutting all layers at once. This made them all a little different and I like that. Now that the background(and it seemed to take forever)was dry I added a thin coat of gesso over the top of everything with an old iTunes card. That only took a few seconds to dry and then I added the grey mists over the top. I dried this with my heat gun, being careful that I did get bubbles in the gel medium. I then laid everything down where I wanted them and then glued them in place. I then added my title and journalling.

See you all again soon.

Love
Michelle

Life.Papaer.Scrapbook Feburary Sketch Challenge Entry

Hi Everyone,

Here is the Life.Paper.Scrapbook sketch:


And here is my entry: 


To create this page I gesso-ed the base cardstock and them added watercolor over the top in Christmas-y colors. While that was drying I cut apart some cardboard box, and then cut it to the shapes I needed. I decided to take a fairly literal approach to this one, and with that in mind cut all the banners and the large backing piece. I then ripped off most of the front part of each of the shapes to reveal the core. I then painted with red, white and copper acrylic paint. I added the jute twine along my chosen line and then stuck everything down. The title was next and then the date stamp and location.


See you all again soon.

Love
Michelle

Friday 21 February 2014

Scrap the Girls Challenge Entry

Hi Everyone,

Here is the photo inspiration from Scrap the Girls:


And here is my entry:


Here are some close-ups:  


To create this page I traced around the Crafter's Workshop stencil with a 0.1 micron pen. I then used my embossing paste to fill the 'bricks' a few at a time and covered with embossing powder and set with my heat gun. I then chose some papers to mat my photo on, cut to size and inked the edges and then glued them together and the stuck them on the page. I then added my title and journalling.

See You all again soon.

Love
Michelle

Sunday 16 February 2014

Weekly Round-Up for Week Seven

Hi Everyone,

This week continues into the second week of LOAD214 - Mythbusters. I am really enjoying the whole process and the daily prompts.

The prompt for Day 9 was: Let someone else take control of what you scrap today. the myth we busted was the we always need to be in control of what we scrap.

Now this isn't always easy to do, but I decided to ask Johnathon what he would like me to scrap and he replied that it needed to be about him and about how awesome he is. He chose the photo, the dies and punches he wanted me to use to create the background and the colors of the spray inks to use. Then he said the rest could be up to me, lol.

This is the end result:


To create the background I took some old book pages and die cut or punched shapes. Next I added both the die-cut/punched pages and the cut outs to the gesso-ed background with gel medium. When that was dry I scraped a layer of gesso over the top. I then added the sprays. While that was drying I chose the papers, letter stickers and thickers I wanted to use. Once the background was dry I completed the page. In the end I decided that the background needed something more, so I traced around some of the shaped to create interest.

I also spent some time playing with dolies and dyes. I wanted a black and white dolie possibly for my Day 10 prompt. When I completed that I created some turquoise one for an upcoming kit I'm getting.


I really like them all. In the end I didn't use the black and white dolie, but that's ok I'll use it at a later date :-)

The prompt for Day 10 was: Use less color, make it black and white. The myth we busted was that all our pages need to be bight and colorful.

This one had me thinking for ages and I ended up sleeping on it because I needed to work out how to 'blend' this with my style.
In the end I chose some bright photos of my ginger plant in bloom.


To create the background I glued old book paper to the top and the bottom of a gesso-ed page, I then ripped to size some patterned paper, in black and white, to go along the centre of the page. While this dried I printed and cut my photos to size and then chose my embellishments. I wanted to keep the embellishments simple on the layout, and in the end I chose a single yellow flower to highlight my yellow flowers. Once the background was dry I scraped a thin layer of gesso over the papers, allowed it to dry and then finished the page.

The prompt for Day 11 was: Start some where different, to begin scrapping from. The myth we busted was that you always have to create the same way, from the same starting place.

Once again this one got me thinking. I use so many different ways to start scrapping already I wasn't sure I could think of one. I already use: photos, papers, kits, prompts, techniques, products, sketches, videos, classes (both locally and on the Internet), mood boards, colors, magazines and books(both physical and online) and shapes. So in the end I chose something I had not used recently and that was from a magazine.

Last week I bought the new Scrapbooking Memories Vol 16 No 7. I had read it pretty much cover to cover the other night when I couldn't sleep. My plan was to flick through the magazine and the first page that caught my eye, I would scrap-lift it.


This photo caught my eye the first time through so this is the one I decided to use.


This is the end result:


To create this page I cut two patterned paper sheets down to size and stuck them together with low tack tape. I then selected 2 stencils I thought would work well together. I did the damask stencil first with gesso and then the large swirl. When they were dry I used a smallish paintbrush to 'paint' the design. While this was drying I selected the flowers for the page and the thickers for the title. I then placed the photo and the flowers. The title was places on a scrap piece of clear plastic from some packaging then glued on top of the flowers.

The prompt for Day 12 was: create your own 'stuff' for scrapbooking. The myth we busted was that that we need to buy/have all the 'new' stuff for scrapbooking.


This one took a little thinking too. I do a lot of recycling on my pages. I get a lot of 'things' from my local op-shop. Fabric, jewelry bits and pieces, and other stuff including buckles, crochet table cloths, etc. I decided to go down a slightly different track for this one as I wanted to stretch myself a little. I decided to go to my scrap box and go from there.

This was the end result:


What I ended up doing was punching some of my favorite butterflies from white cardstock and left over patterned papers. I then stitched them together to create a garland for my page. From there I completed my page.

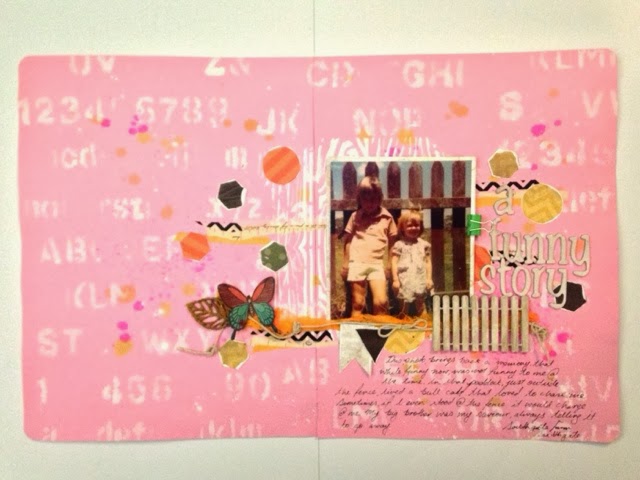
The prompt for Day 13 was: journalling does not always require full sentences. 

This was a little bit of a no-brainer, I decided to use dot points for my journalling, the problem was choosing the photo/photos to scrap. In the end I chose some photos of my childhood holidays. There are very few photos of these holidays and I wanted to fully capture the joy of these times.

This was the end result: 


I used some leftovers from a Basic Grey page kit to create this page. Even the lined piece I wrote my journalling on is from this kit, it was the backing in the packaging for the chromed squares.

The prompt for Day 14 was:use products not specifically made for scrapbooking. The myth we busted was that you can only create with scrapbooking products.

This really was a simple one for me. I use so many things on my pages that were not designed for scrapbooking, as I mentioned earlier. I love srapbooking outside the box :-)


This was the end result: 
To create this background I used the leftover book page pieces from another page and masking tape, glued to a gesso-ed base. I then sprayed with spray inks and allowed the background to dry. While that was drying I chose the papers and Thickers to go with the photos I had chosen and cut down to size. When the background was dry I completed the page.
The prompt for Day 15 was: re-use a photo you had already used (in this LOAD, a previous LOAD or just a photo you have scrapped before. The myth we busted was that you must always scrap new, unused photos.
I chose to re-use the photo of my daughter on the swing, but in color instead of black and white, as it portrayed the essence of the story I wanted to tell better.
This was the end result: 


To create this page I used modeling paste over a stencil on a gesso-ed background. When that was dry I sprayed my palest spray along the top and let it run down the page. When that was dry I sprayed my next darkest color in a few places and let that run down the page. When that layer was dry I then added my final spray  and let it run down the page. It was a little darker than what I wanted so I soaked a little of it back up with paper towel. When that was dry I decided where I was placing my photo and then stamped in silver ink around the outside to create a mat for my photo. While this dried I added a black mat to my photo and got out my letters for my title. I then completed to page.

See you all again soon.

Love
Michelle

Wednesday 5 February 2014

Sketchabilities #108 Sketch Challenge Entry

Hi Everyone,

Here is the Sketchabilities sketch:


And here is my entry:


I really loved this sketch, it was interesting but still allowed for the white space I love so much. 

I created the background by gluing old book paper to cardstock. When that was dry I ripped all around the edges, then scrapped gesso on with an old gift card I had. I then cut my hemp cord to size and decided where I wanted to glue it down and marked them with a pencil. I then stamped the stitched circles and then sprayed in the circles with orange mist and used my finger to spread. I also used my finger to start the runs where I wanted them to go. When this was dry I added the blue mist and again used my finger to get the runs where I wanted them. I created a heart template by hand and then cut it out from some of the Gelli Plate prints I made on Sunday. I then glued everything down on the layout, the pegs are just glued on top of the hemp cord. Lastly I added a little extra gesso where I wanted to write my journalling and while it dried I added my title and then wrote my journalling.

I hope you like my page, as much as I do.

See you all again soon.

Love
Michelle

Tuesday 4 February 2014

Life.Paper.Scrapbook January Color Moodboard Challenge Entry

Hi Everyone,

Here is the Life.Paper.Scrapbook January Color Moodboard:


And here is my entry:


I created this page sticking book paper to cardstock. I then created the pink background by adding Picked Raspberry Distress Stain directly to the background and spreading out with a palette knife. When dry I completed my page from a Polly Scraps kit.

See you all again soon.

Love
Michelle

ScrapFriends Sketch Challenge #21

Hi Everyone,

This is my entry for the ScrapFriends Sketch Challenge #21 for January 2014.


Unfortunately my internet has been experiencing some problems and I have been flooded in and out on my property, so I was unable to get my entry submitted on time, I hope you enjoy it anyway.

See you all again soon.

Love
Muchelle